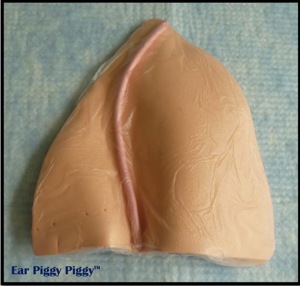
3 T Training Tool: Ear Piggy Piggy™
| Record number: | ad420 |
|---|---|
| Category: | Surgery - Education and training |
| Type: | Simulator |

Ear Piggy Piggy™ is part of the 3 Ts Training Tools for demonstration, teaching and practice of venipuncture of the marginal ear vein of pigs. The 3 Ts is a method used to provide training to individuals working with animals in research, testing and teaching settings. The 3 Ts incorporates simple, inexpensive, and effective hand-crafted tools to teach and encourage practice of non-surgical and surgical procedures, prior to conducting similar training and practice on live animals.
More information about Translational Training Tools™ here.
Ear Piggy Piggy™ consists of a spongy material to imitate the structure of the ear and includes a long, skinny balloon to serve as the vein. The vein may be left uncovered for better visibility. May begin using non-gloved hands to allow for unimpeded dexterity during the early stages of learning. As the skills progress, do the practice while wearing gloves. Proceed with training on live animals.
Ingredients:
- 2 - Sheets of thin craft-foam (our preference is Foamies with Sticky Back, 9” x 12” x 2
mm) - 1 – Long balloon (160 Q)
- 2 – Pipe cleaners (6 mm x 12”)
- 1 – Piece of transparent cling wrap (our preference is Press’n Seal®)
- 2-3 ml of fake-blood (our preference is Vampire Blood®)
Supplies: Crafting scissors, Sewing needle, Syringe, Soft-tip catheter & Glue gun if unable to obtain sticky-back foam.
Instructions:
- Place 2 pieces of foam together (if using sticky back, place non-sticky side together)
- Draw the shape of a pig ear onto the side of the foam that is facing up
- With both pieces of foam held with non-sticky side together, cut the ear shape from the 2
pieces of foam - Lay both pieces of foam on the work surface, sticky-back side up
- Peel the sticky back away from both pieces of cut foam (if unable to find sticky back foam,
use a glue gun to seal the pipe cleaner to the foam pieces) - Mold the pipe-cleaner into the shape of the foam ear, such that the pipe-cleaner will sit
approximately ½ cm short of the border of the foam ear. - Either cut and remove any excess pipe-cleaner, or simply tuck the excess pipe-cleaner
around the part of the pipe-cleaner structure - Sandwich the molded pipe-cleaner between the sticky sides of both pieces of the foam
ear and press the opposing pieces of foam together foam (If unable to find sticky back
foam, use a glue gun to seal the pipe cleaner to the foam pieces) - Cut a short groove (about 3 mm) at both the base and the tip of the ear
- Mold the pipe-cleaner at the base of the ear so that it forms a slight fold in the ear
- When ready to use, fill the balloon with fake-blood and tie a small knot into both ends of
the blood-filled balloon - Orient the blood-filled balloon from the center of the base of the ear, securing the
knotted ends of the balloon into the grooves at the base and tip of the ear - Cover the ear with cling wrap
The Ear Piggy PiggyTM is now ready for use. Images to help guide the process of making an Ear Piggy Piggy, please see The Joy of Training Cookbook, Volume 1, page 76.
For more information, please contact Dr. Wendy Williams.
3 Ts Training Tools consists of the following products:
- FP Balloon™
- Venipuncture Tools:
- Tube Tail™ (venipuncture of the lateral tail vein)
- Spongy Bunear™ (venipuncture of the rabbit marginal ear vein)
- Ear Piggy Piggy™ (venipuncture of the marginal ear vein of pigs)
- Cephalic Tube™ (venipuncture of the canine or feline cephalic vein)
- Cardiac Balloon™ (cardiac-puncture blood collection in rodents)
- CD Mouse™ (validation of competency of cervical dislocation euthanasia in rodents)
- Pink E. D. Cap™ (validation of competency of decapitation euthanasia of neonatal mice)
For other uses of the FP Balloon™, please see The Joy of Training Cookbook, Volume 2: (Recipies for crafting your own purpose-specific training tools for surgery practice).
Please see Dexterity Tools™ and Exercises from Volume 2:
1. Macro Dexterity Tools™:
2 . Micro Dexterity Tools™:
Thanks for your feedback! Please note that we cannot reply to you unless you send us an email.
What are you looking for?
We value your feedback so we can improve the information on the page. Please add your email address if you would like a reply. Thank you in advance for your help.!
Please contact us by email if you have any questions.
