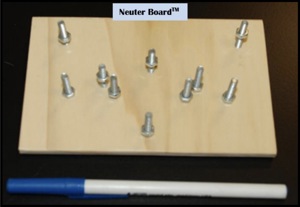
3 T Training Tool: Neuter Board™
| Record number: | c8975 |
|---|---|
| Category: | Education and training - Surgery |
| Type: | Simulator |

Neuter Board™ is part of the 3 Ts Training Tools (3 Ts), a training method designed to provide hands-on training and practice for individuals working with animals in research, testing and educational settings. They incorporates simple, inexpensive, and effective tools to teach and encourage practice of non-surgical and surgical procedures, prior to conducting similar training and practice on live animals. The tools used for the 3 Ts surgical curriculum for Aseptic Rodent Surgery Training and Practice is called the “3 Ts Dexterity Tools™”. These exercises are designed to address many of the common repetitive hand motions and skills required to perform surgery. Trainees will learn to translate the skills they have developed on the 3 Ts inanimate training tools into practice on live animals.
More information about Translational Training Tools™ here.
Neuter Board™ consists of bolts that are secured into a sealed wooden platform. Nuts are attached to the bolts and the trainee is provided with at least one pair of needle holders. Different types of needle holders will provide the trainee with an opportunity to explore personal preferences for instrument selection.
Key Learning Issues:
- Practice the proper grasp of a needle holder during repetitive motions
- Practice of pronating and supinating motions of the wrist required for using a needle holder for suturing
- Appreciation of how the proper hand position assists in powering the instrument, during the supination motion that is required to remove the nuts
- Determine how to maneuver the needle holder to access structures in different orientations and in tight spaces
Description of the exercises:
- Stabilize the board in place with the non-dominant hand (If left-handed instruments are
not available, then left-handed individuals may choose to use their left hand to stabilize
the base of the Neuter Board™). - Using the proper grasp of the dominant hand on the needle holder, grasp one of the
nuts. - Remove the nut from the bolt, using a supinating motion of the wrist.
- Start with the nuts that are attached to bolts more widely spaced from others. The
orientation of these bolts will provide more access to the nuts and facilitate a less
obstructed rotation of the needle holder. - Once the comfortable with the first stage of the exercise, proceed to remove the nuts
that are more closely aligned to one another; thus creating a challenge to properly alter
the needle driver position accordingly to remove the nuts in a more confined space. - Remind the trainee to accomplish the goal is to accomplish the task while using proper
surgical skills rather than simply to remove the nuts as quickly as possible.
Note that if the nuts are too easy to unscrew, we have noticed that some students
attempt to tap at the nuts off using the tip of the needle holder. We have combatted this
issue by using a product called Loctite® to make the nuts more difficult to remove.
Ingredients:
- One base board made of sealed hardwood: We used a base board cut to thef ollowing dimensions: 7”x5”x0.25”
- Box of bolts and corresponding nuts. We used bolts with the following
dimensions: 5/32nd” diameter x 1.25” long
Supplies: Glue, A clamp or heavy weight to hold the wooden base in place while drilling holes
into it, Locktite® nut and bolt locker (http://www.loctiteproducts.com/), at least one needle holder
Instructions:
1. Using a pencil, mark the base board with the pattern that you want to use for placement of the bolts. We used an elongated star pattern to create bolts that were aligned in various distances from one another, to allow for different levels of challenge for removing the nuts during the practice exercises.
2. Secure the base in place using a clamp or heavy weight.
3. Drill holes over the marked areas to create a pattern of holes into which the bolts will be placed.
4. Once the bolts are flush with the base board, glue the bolts to the back of the base board to securely hold them in place and prevent them from spinning.
5. Apply a small amount of Locklite® to the bolt to make the nuts a bit more difficult to remove. If applied too liberally, the nuts will become too tightly adhered to the bolts to be effective as a training tool.
6. Screw the nuts down onto each of the bolts.
For more information and images to help guide the process, please see The Joy of Training Cookbook, Volume 2: (Recipies for crafting your own purpose-specific training tools for surgery practice).
Dexterity Tools™ and Exercises from Volume 2:
1. Macro Dexterity Tools™:
-
- Bead Board™
- Neuter Board™
- Tissue Board™
- Nail Board™
- Cutting Ring™
2 . Micro Dexterity Tools™:
Please also see The Joy of Training Cookbook, Volume 1: (Recipies for crafting your own purpose-specific training tools for non-surgical procedures).
3 Ts Training Tools from Volume 1:
- FP Balloon™
- Venipuncture Tools:
- Tube Tail™ (venipuncture of the lateral tail vein)
- Spongy Bunear™ (venipuncture of the rabbit marginal ear vein)
- Ear Piggy Piggy™ (venipuncture of the marginal ear vein of pigs)
- Cephalic Tube™ (venipuncture of the canine or feline cephalic vein)
- Cardiac Balloon™ (cardiac-puncture blood collection in rodents)
- CD Mouse™ (validation of competency of cervical dislocation euthanasia in rodents)
- Pink E. D. Cap™ (validation of competency of decapitation euthanasia of neonatal mice)
For more information, please contact Dr. Wendy Williams.
Thanks for your feedback! Please note that we cannot reply to you unless you send us an email.
What are you looking for?
We value your feedback so we can improve the information on the page. Please add your email address if you would like a reply. Thank you in advance for your help.!
Please contact us by email if you have any questions.
