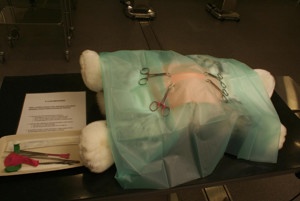
Laparotomy / Incision
| Record number: | 34799 |
|---|---|
| Category: | Surgery |
| Type: | Simulator |

This model uses a toy dog with an air-filled balloon placed in the abdomen, covered by skin, subcutaneous tissue and fascia (polyurethane and latex).
An abdominal incision is made through the "skin" and "subcutis". The "fascia" is localised and a stab incision (tenting) is performed without harming the balloon. The incision line is then extended.
Materials:
- Stuffed toy dog. The abdomen has an open hole (approx. 25 x 20 cm)
- 4mm foam bandage (e.g. Allevyn) cut to approx. 25 x 20cm
- Latex 70016556, natural, 0,30
- A round balloon
Set up:
- Cut a 25 x 20 cm piece of Allevyn and a similar size piece of latex
- Use spray glue to combine the two layers, thereby forming the "abdominal wall".
- Fill the balloon with air and place it on the abdomen
- Cover the hole and balloon with the Allevyn/latex and fix it to the dog with towel clamps
- Drape the site and cut a hole in the drape (approx. 7 x 3 cm)
- Fix the drape with towel clamps. Make sure to put a finger on the inside of the Allevyn/latex layer while fixing, so that the balloon is not accidentally punctured with the point of the clamp
One "abdominal wall" will allow at least 8-10 attempts before it should be replaced.
The following supplies should be available at the work station:
- Extra pieces of "abdominal wall"
- Scalpel
- Two tissue forceps
- An abdominal furrowed probe
- Extra balloons
Student instructions:
Make a midline incision in the abdominal wall without damaging the viscera (harming the balloon).
- Incise the skin and subcutaneous layer (Allevyn)
-
- Remember to use two fingers to stretch the skin
- Do not lift the scalpel once you have started incising
- Use a pencil-grip for shorter incisions in small animals
- Grab the linea alba/fascia (to create tenting) and make a stab incision
-
- Use one or two tissue forceps
- Do not let go of the hole once you have made it
- Extend the incision in both directions, using a guide (tissue-forceps/fingers/probe) and scalpel or scissors
This resource was developed by Associate Professor Rikke Langebæk at the University of Copenhagen and is cited with her permission.
Thanks for your feedback! Please note that we cannot reply to you unless you send us an email.
What are you looking for?
We value your feedback so we can improve the information on the page. Please add your email address if you would like a reply. Thank you in advance for your help.!
Please contact us by email if you have any questions.
